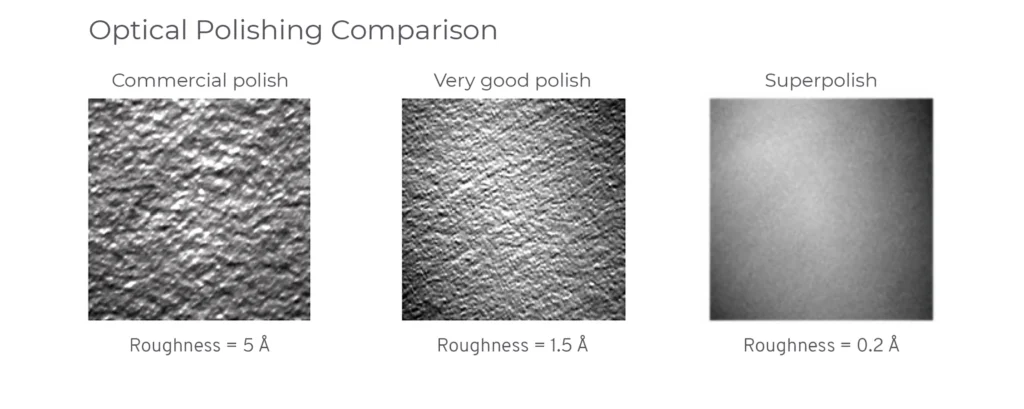
The continuous push for higher throughput and lower loss in laser systems necessitates optical components that minimize scatter, particularly for high-power lasers or short wavelengths. Optics that achieve this through ultra-low surface roughness are often referred to as “superpolished.”
While there is no industry standard for defining superpolished optics, Notch Optics has developed a process capable of polishing optical surfaces to an RMS surface roughness of less than one angstrom (\(10^{-10}\) m) for parts-per-million-level scattering.
Superpolished optics are ideal for sensitive laser applications such as cavity ring-down systems for gas analysis, laser gyroscopes, and other systems that require low-defect optics. These highly controlled surfaces complement low-loss coating technologies like ion beam sputtering (IBS).
How to Measure Sub-Angstrom Surface Roughness
Each metrology device has its own range of measurable spatial frequencies. Figure 1 illustrates the overlapping spatial frequency ranges of three technologies often used for measuring surface roughness: conventional interferometry, white light interferometry (WLI), and atomic force microscopy (AFM).
Different spatial frequency ranges correspond to different types of surface errors. Although these frequency groups do not have strict boundaries, they are generally understood to cover specific ranges.
A conventional HeNe interferometer is ideal for measuring lower spatial frequencies related to typical Zernike polynomials, known as figure error. While these slightly overlap with the mid-spatial frequencies measurable by WLI, WLI is better suited for capturing this finer level of surface errors, known as waviness. In this range, errors begin to contribute to scatter and performance degradation.
Both WLI and AFM can measure roughness, but the critical spatial frequency group depends on the application. Visual and longer-wavelength applications are generally measured below 2,000 cycles/mm, making WLI suitable. AFM is ideal for detailed surface examination and is necessary for measuring high spatial frequencies required for UV applications.
Figure 1: Spatial frequency ranges of common devices revealing overlaps in their capabilities.
Using instruments with a higher spatial frequency range often comes at the cost of a smaller field of view. AFM can directly measure sub-angstrom surfaces but has a limited field of view and high sensitivity, making it more suitable for laboratory use than for roughness measurements in a production setting.
Data correlation between AFM and WLI, along with measures to optimize WLI performance, enabled Notch Optics to confirm that WLI can effectively measure sub-angstrom RMS surface roughness of superpolished surfaces in production.
How Are Superpolished Optics Made?
Traditional optical polishing is an iterative process using progressively finer abrasive grits to remove damage from earlier grinding and polishing steps. Regardless of how fine the grit is, subsurface damage is an inherent result of loose abrasive polishing.
Damage sites at or below the surface increase surface roughness and energy absorption, leading to higher energy scattering, heat generation, and decreased system efficiency. Scatter is proportional to the square of the surface roughness.
However, the process at Notch Optics for creating superpolished optics completely eliminates subsurface damage by shifting from mechanical polishing to a focus on chemical reactions between the slurry, glass, and polishing lap.
Mechanical action is used solely to remove material from the substrate as the chemical reaction occurs within the Beilby layer. Although silica glass is insoluble in water, the Beilby layer—formed during polishing and modified by the diffusion of hydroxyl ions—serves as a protective barrier against further change.
Sub-angstrom surface roughness optics are created through submersion polishing, where a hydrated lap with slurry is maintained at the same temperature as the optic. Both temperature and pH levels are carefully controlled to promote a chemical reaction, while surface tension prevents contaminants from interfering.
Optical Polishing Comparison

Superpolishing provides exceptional performance for applications that require extremely low surface roughness.
With a Scratch-Dig rating of 5-2, surface roughness below 0.5 angstroms, and zero defects observed at 300x magnification, most superpolished optics come with polished or acid-etched outer diameters and bevels, enhancing their cleanliness and durability.
Common superpolished materials include N-BK7, calcium fluoride, crystal quartz, fused silica, sapphire, silicon carbide, YAG, Nd, and ZERODUR.
Sapphire Polishing
Sapphire is an exceptional material ideal for many ultraprecision optical applications, with transparency ranging from the lower UV (142 nm) to the mid-infrared (6.5 µm). Its high tensile strength makes it suitable for high g-force environments.
Additionally, sapphire’s high radiation tolerance makes it perfect for space-based applications. Due to its significant mechanical strength, sapphire is challenging to polish. However, our advanced superpolishing processes enable us to achieve surface roughness better than 1 Å on sapphire components.
Silicon Carbide Polishing
Silicon carbide (SiC) is widely used in the optics industry as an alternative to beryllium components. It provides advantages such as low weight, high specific stiffness, high thermal conductivity, and outstanding dimensional stability. Our expertise includes polishing silicon carbide mirrors, including CVD SILICON CARBIDE™ and lightweight versions of the material.
We also provide polishing services for customer-supplied substrates and offer SiC cladding with IBS coatings to achieve the highest quality surface finish. Additionally, we supply optical coatings on the completed mirrors.
Superpolished Optics from Notch Optics
Notch Optics has demonstrated that sub-angstrom superpolished surfaces can be consistently achieved on planar and spherical optics made from fused silica. These surfaces showed no observable structure from the manufacturing process and no measurable subsurface damage (Table 1).

Table 1: Submersion polishing was proved to reduce RMS surface roughness from >7Å to <1Å.
Comparison of Three Superpolish Providers

